In this post, I will show how to upload a file from Angular 9 with .NET Core.
Uploading a file is the process of uploading a file from the user’s system to a hosted web application server. You may choose to store the file in the web server’s local disc or in the database.
It is easy to upload one or more files from Angular 9 with .NET Core 2.2, 3.1, or above versions.
In this post, I will show what code is needed in the Angular component and service to upload a file to the server-side using .NET Core 3.1. I will also cover some basic client-side validation from Angular 9.
Upload a file from Angular
Video Demo
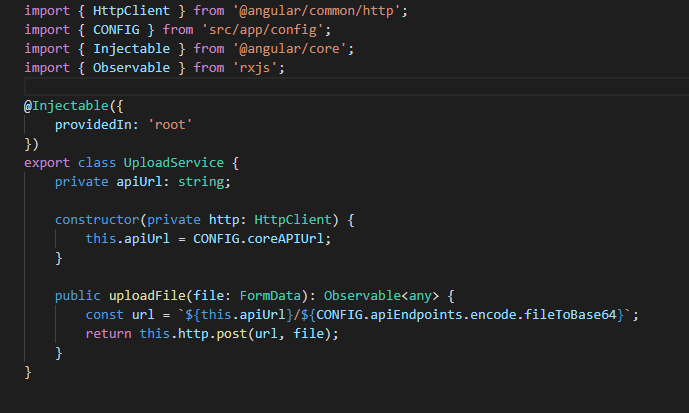
Service
import { HttpClient } from '@angular/common/http';
import { CONFIG } from 'src/app/config';
import { Injectable } from '@angular/core';
import { Observable } from 'rxjs';

@Injectable({
    providedIn: 'root'
})
export class UploadService {
    private apiUrl: string;

    constructor(private http: HttpClient) {
        this.apiUrl = CONFIG.coreAPIUrl;
    }

    public uploadFile(file: FormData): Observable {
        const url = `${this.apiUrl}/${CONFIG.apiEndpoints.encode.fileToBase64}`;
        return this.http.post(url, file);
    }
}
In this service, we have a HttpPost method in which we post the file to the server to upload the local file. This is done using FormData as a parameter.
Component
import { Component, OnInit, ChangeDetectionStrategy, ViewChild, ElementRef } from '@angular/core';
import { FormGroup, FormControl, Validators } from '@angular/forms';
import { LoadingService } from '@control-tower/lib';
import { Subject } from 'rxjs';
import { FileContentModel } from '../model/file-content-model';
import { HttpErrorResponse } from '@angular/common/http';

@Component({
  selector: 'app-upload',
  templateUrl: './upload.component.html',
  changeDetection: ChangeDetectionStrategy.OnPush,
  providers: [LoadingService]
})
export class UploadComponent implements OnInit {

  @ViewChild('fileInput', {static: false})
  myFileInput: ElementRef;
  public fileContentModel: FileContentModel;
  public form: FormGroup;
  public errors: string[] = [];
  private destroy: Subject = new Subject();

  constructor(
    private uploadService: UploadService
  ) { }

  public ngOnInit() {
    this.form = this.buildForm();
  }

  private buildForm(): FormGroup {
    return new FormGroup({
      fileContact: new FormControl('', [Validators.required])
    });
  }

  public Submit(files: File[]): void {
    this.handleFileInput(files);
  }

  public handleFileInput(files: File[]): void {

    if (this.form.valid && files[0].name.split('.').pop() === 'excel') {
      const formData = new FormData();

      Array.from(files).forEach(f => formData.append('file', f));

      this.uploadService.uploadPdfToGetBase64(formData).subscribe(
        (res: any) => {
          this.myFileInput.nativeElement.value = '';
        },
        (errorRes: HttpErrorResponse) => {
          alert('error occured');
          this.form.reset();
          this.myFileInput.nativeElement.value = '';
        }
      );
    } else {
      alert('Invalid file selected. Only excel is allowed');
    }
  }

}
Explanation
In this component, we consume UploadService in the constructor and then invoke the upload method to send the file to the server.
We create an instance of FormData and append the files to it as KeyValue pair.
Once the response is received, we could display success message or in case of error, we display appropriate error message.
In this example, I have applied a validation to check only excel files can be selected. Any other files selected will show an error message to the user.
Let me show what HTML will look like for file upload.
<form [formgroup]="form">
  <div class="form-group">
    <label for="file"></label>
    <input type="file" #fileinput="" formcontrolname="fileContact" id="file" required="" (change)="handleFileInput($event.target.files)">
    <button type="button" class="btn btn-info" (click)="clearSelection()">Clear</button>
  </div>
</form>
I have separate posts to set up upload functionality with .NET Web API and .NET Core versions. Both do the same functionality however, the way you read the files is a little different.
Reference Posts:
- How to upload a file in ASP.NET Web API
- How to upload a file with .NET CORE Web API 3.1 using IFormFile
Conclusion
In this post, I showed how to upload a file from Angular 9 with .NET Core. That’s all from this post. If you have any questions or just want to chat with me, feel free to leave a comment below.
Good day! I could have sworn I’ve been to this website before but after reading through some of the post I realized it’s new to me.
Nonetheless, I’m definitely glad I found it and I’ll be bookmarking
and checking back frequently!
Hi there! This post could not be written much better!
Reading through this post reminds me of my previous roommate!
He continually kept preaching about this. I will forward this post to him.
Fairly certain he’s going to have a very good read.
Thank you for sharing!