This post covers how to provision virtual machines using ARM Templates that is part 4 of Implement Iaas Solutions. We have been learning how to provision virtual machines using various methods like Azure Portal, CLI, Powershell. Let's learn about ARM Templates.
An ARM template is a JSON‑formatted file that is a configuration document that defines what resources you want to be deployed in Azure with their configurations. You can create any resource with an ARM template.

Understanding ARM Templates
I will be focusing on Virtual Machine in this ARM Template topic. ARM templates are a building block for deployment automation. Using ARM templates, you can parameterize the configuration elements for resources defined in an ARM template.
You can use parameters for commonly changed configuration elements such as virtual machine names and many more. Other elements are image names, network security, storage account name, and many more.
After that, you can then use that same ARM template repeatedly to deploy the environment defined in the template. However, use different parameters to customize each environment at deployment time.
For example, you can have each set of parameters for Dev, QA, Stage, and one for Production that will provide consistency to your deployments.
How ARM Template works?
You create an ARM template and then an ARM template is submitted to Azure Resource Manager for deployment. The tools used are Azure CLI, Powershell, Azure Portal.
Once the ARM Template is deployed, it reads the details inside the ARM Template like creating resources, depleting resources modifying existing properties or creating new properties.
Creating ARM Templates
- You can build and export an ARM template from the Azure portal.
- Write your own manually.
- Also, you can start from the Quickstart library, which is a collection of community templates available in the Azure portal in the Custom deployment blade.
In order to focus on the higher-level process of how ARM templates work, we will mainly cover the building and exporting of an ARM template in the Azure portal.
How it works?
After you deploy an ARM template, Resource Manager receives that template, formatted as JSON, and then converts the template into REST API operations. This means you can use ARM Templates using many tools that include Azure Portal, CLI, Powershell.
ARM Template Structure
Let's go through the structure of the ARM Template.
{
    "$schema": "http://schema.management.azure.com/schemas/2015-01-01/deploymentTemplate.json#",
    "contentVersion": "1.0.0.0",
	"apiProfile":"",
    "parameters": { },
    "variables": {},
	"functions": [],
    "resources": [],
    "outputs": {}
}
First, we have some header information. Schema is the location of the JSON schema file that describes the template's language.
Content version is the version of the template, which is defined by you so that you can version control your templates.
apiProfile, which allows for versioning of the resource types that are defined in the template.
Parameters, which are used to provide values during deployment so that the same template can be reused for multiple deployments. This is where you'll define deployment‑specific configuration parameters, and this is very useful when you want to be able to use that same template over and over again, but change out the parameters for specific deployments. Common parameters are resource groups, regions, resource names, and network configurations.
Variables define values that are reused in your templates and are often constructed from parameter values.
Functions allow you to create customized functions that simplify your templates and help enable reuse of templates. A common use for functions is generating a resource name based on the environment that it's being deployed into.
To create your own functions, see User-defined functions.
The commonly used function is concat which combines multiple string values and returns the concatenated string, or combines multiple arrays and returns the concatenated array.
Example
{
  "$schema": "https://schema.management.azure.com/schemas/2019-04-01/deploymentTemplate.json#",
  "contentVersion": "1.0.0.0",
  "parameters": {
    "prefix": {
      "type": "string",
      "defaultValue": "prefix"
    }
  },
  "resources": [],
  "outputs": {
    "concatOutput": {
      "type": "string",
      "value": "[concat(parameters('prefix'), '-', uniqueString(resourceGroup().id))]"
    }
  }
}
for more information read it from string functions
DEMO
It is time for the demo, to get started we will log in to Azure Portal and create an ARM Template. Follow the instructions in detail of how to Provision virtual machines using the Azure portal | Implement IaaS solutions | Part 1
Once you are on the final page as shown in the image below.
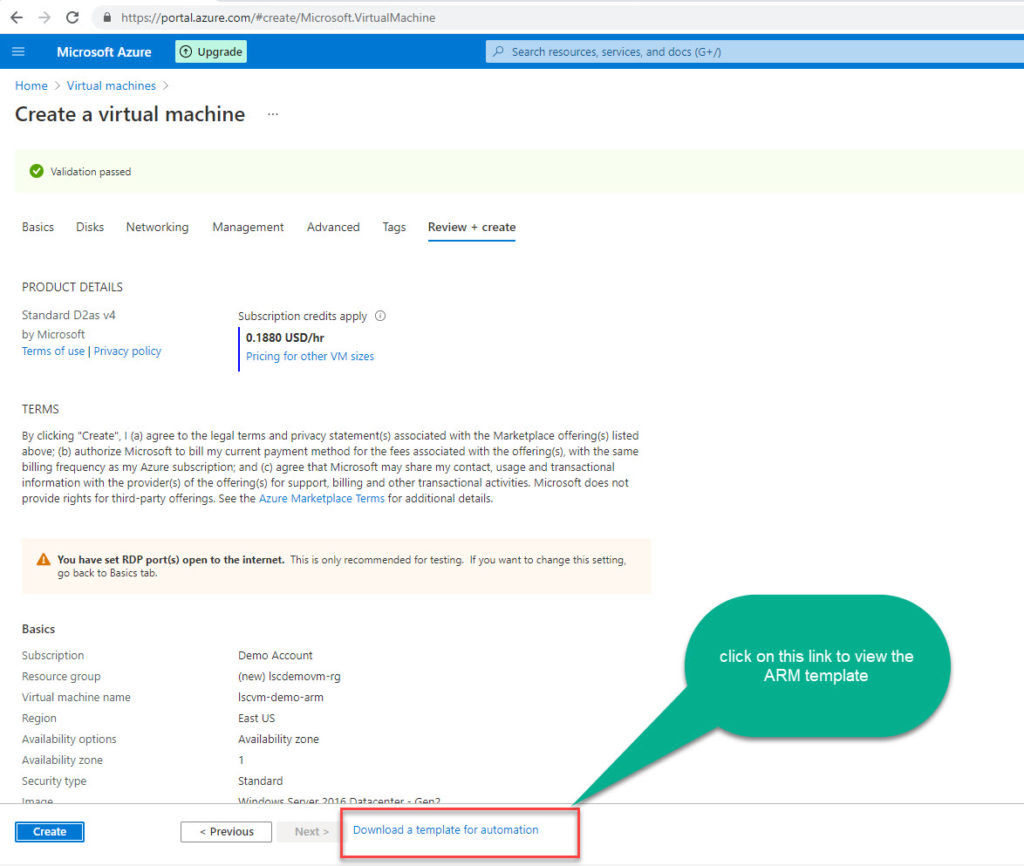
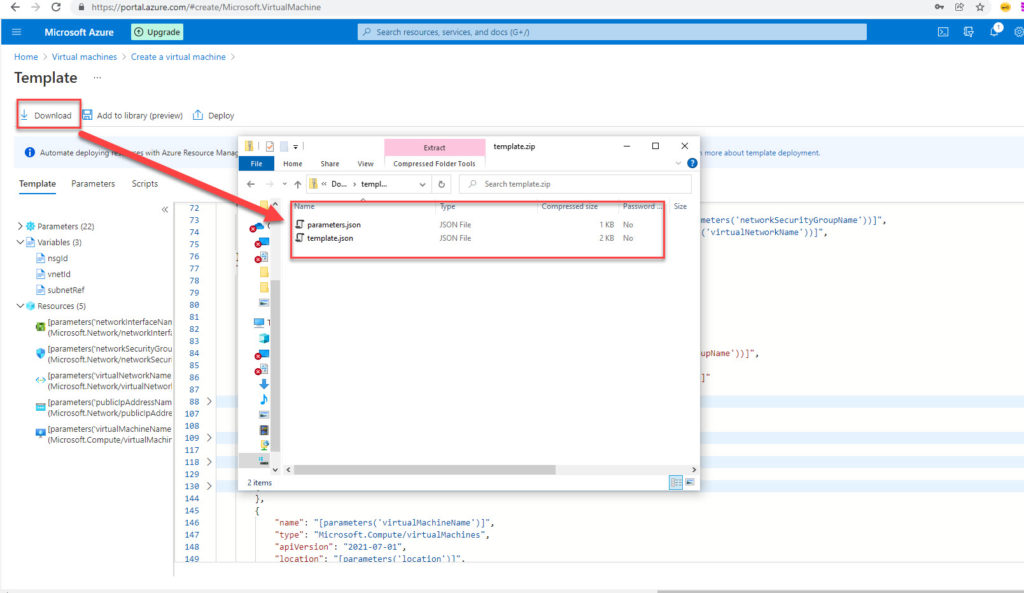
Instead of clicking on create which we normally do, we will click on "Download a template for automation" to view the template. This creates the template and parameters JSON files needed for an ARM template‑based deployment for the virtual machine that we just configured.
From this screen at the top, we can click Download to download the template and parameters files, we can click Add to add them to a library for further deployments inside of Azure, or we can deploy them right from here.
Examining an ARM Template
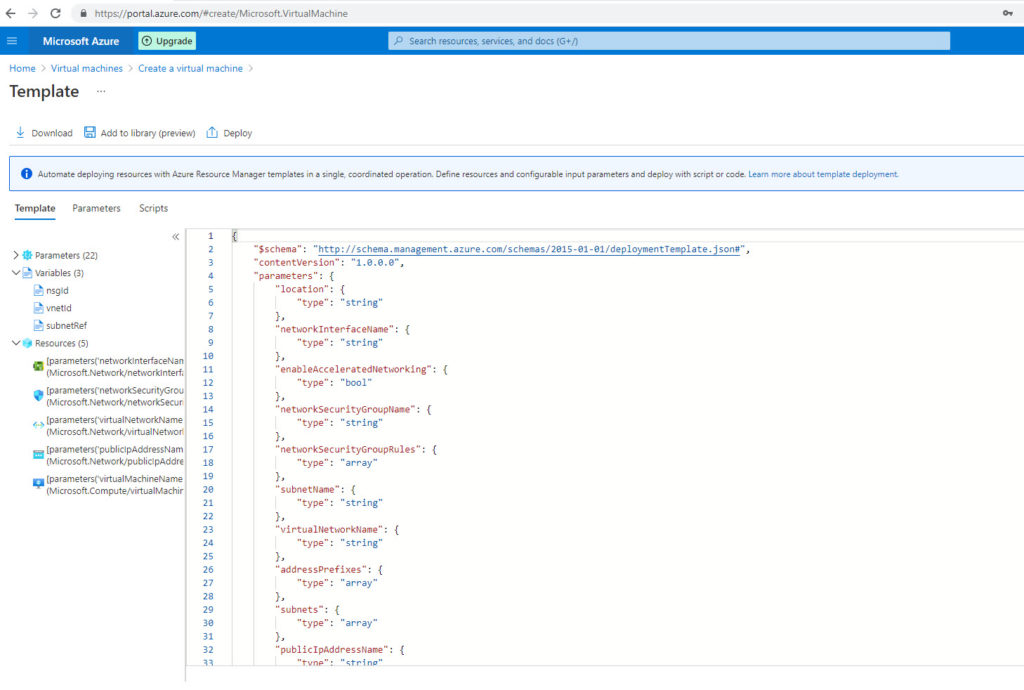
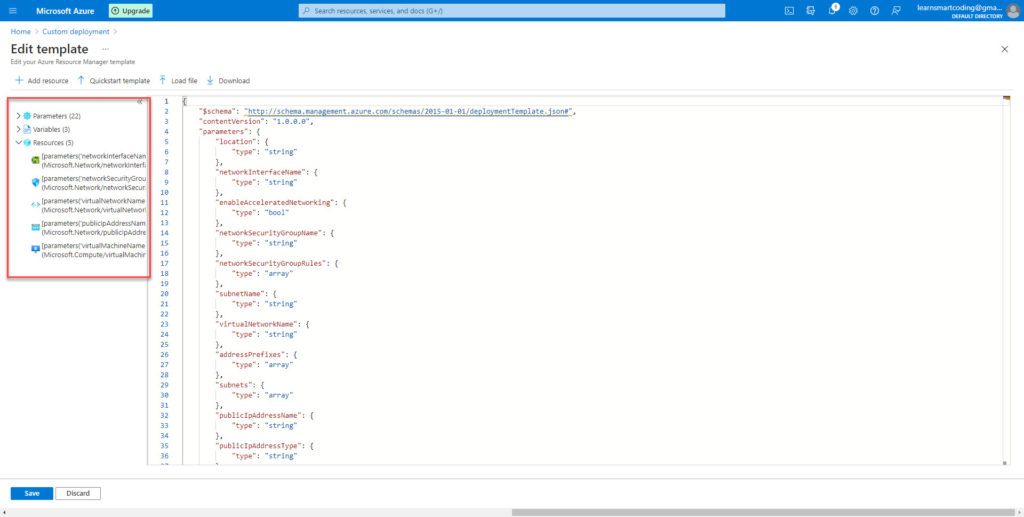
In this template, we can see that we have three sections defined, Parameters, Variables, and Resources. It is important to note that not all the sections are mandated to fill, many are optional. If we don't provide them, the default values will be taken.
In this template, we have 19 different parameters defined, 3 variables, and 5 resources.
Parameter section | ARM Template
The template starts with parameters, you can see that these are the parameters used to provide values for unique deployments allowing us to change them at runtime. In this section of a template, it's just the declaration of the parameters. The actual parameters of values for this particular deployment are going to be in the parameters file.
Some of the exposed parameters in this template are location, networkInterfaceName, enableAcceleratedNetworking, networkSecurityGroupName, virtualNetworkName, networkSecurityGroupRules, and so on.
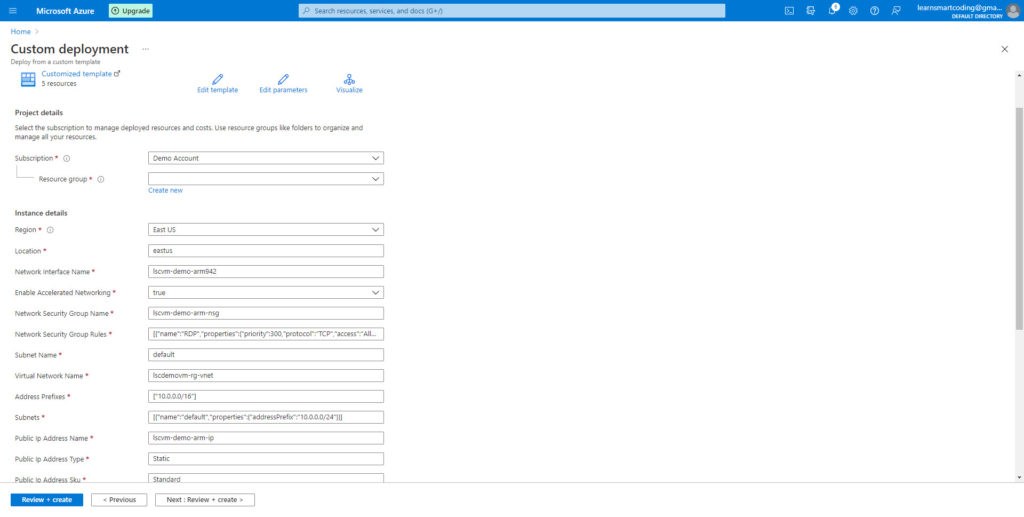
A collection of parameters are exposed in this template. The values are going to come from the parameters.json file. clicking on the parameter tab will present you with the following parameter values.

All the sections that we filled in the Azure portal to create a virtual machine are included in the parameter values.
Decoupling these values from the template allows us to use that template file over and over again, setting unique values for each deployment in this parameters file.
Variables section | ARM Template
Variables are used to define values for reuse in a template. And there are three variables in this template, we will look into those.
The first variable is nsgId. A system function being used, resourceId. This will return the resource ID of a defined resource. The value that is returned from that function is stored in the variable nsgId.
nsgId is reused within the ARM template so frequently.
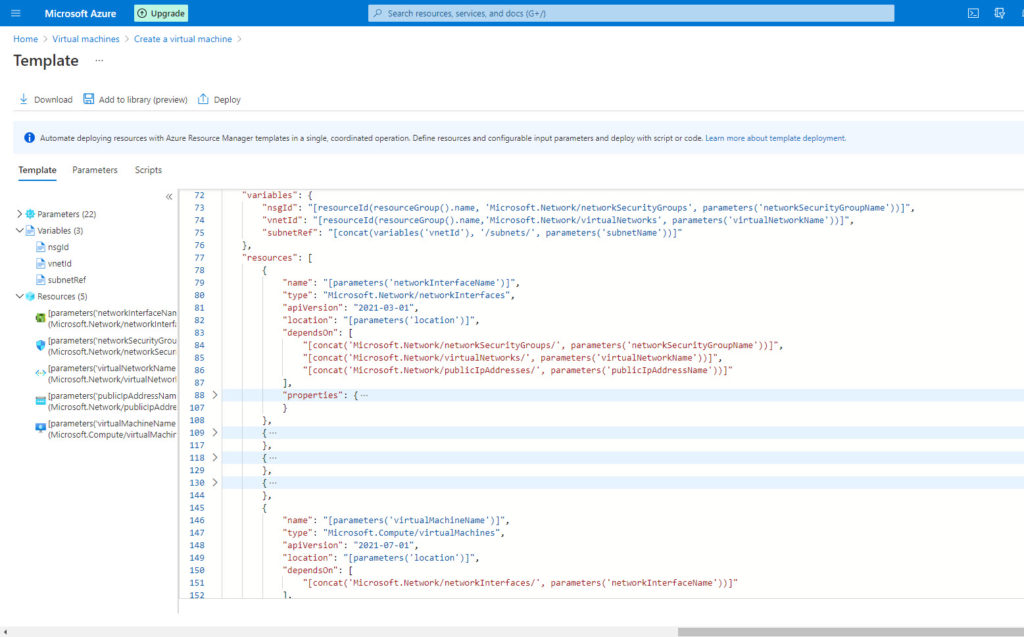
We then see the virtual network name as the second variable that was passed in via a parameter. And then for the final variable, we see subnetRef. It's going to use another system function, concat, to concatenate together the values of the vnetId variable, the string subnets, and a template parameter named subnetName. That's going to combine those strings all together to set the value for subnetRef.
Resources section | ARM Template
The last part is resources. There are 5 resources defined in this template. These are the actual resources being deployed in Azure by this ARM template.
In the resources section, we have an important section called the dependsOn section, which is a list of resources that this resource depends on before it gets deployed. And so this is a way for us to define some ordering and how resources in this template are created. This network interface won't be created until these three other resources defined are deployed.
Similarly, all the other sections are defined in this way and the ARM template will deploy the dependent resources first before any other resources are deployed.
Deploying ARM Template
This downloads a zip file containing parameter.json and template.json files. If I wanted to deploy this template as is, I can click Deploy and that will take me to the custom deployment page to start a deployment. Clicking Deploy, you can see that it has prepopulated the parameters that we entered when we created the ARM template.
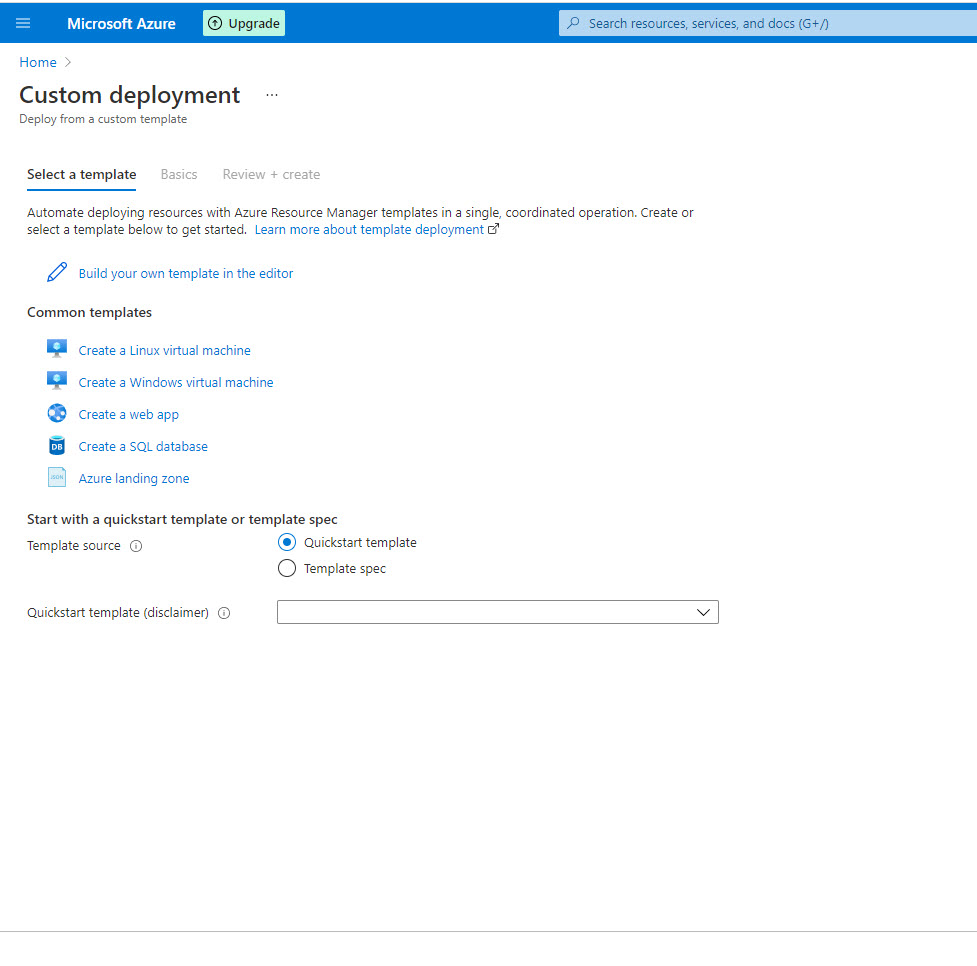
Deploy a custom template
Let me show you how to build this template from scratch. In the search box, search with "Deploy a custom template" and choosing this will present a screen to get started with our own template.


You need to provide an Admin password that was not in the downloaded template. You can edit the parameter file and update the admin password there or provide it in the Azure portal.

Now, it's a regular step to click on create a virtual machine.
Deploying ARM Template using Powershell
#Let's login, may launch a browser to authenticate the session.
Connect-AzAccount -SubscriptionName 'Demo Account'


#Ensure you're pointed at your correct subscription
Set-AzContext -SubscriptionName 'Demo Account'


#If you resources already exist, you can use this to remove the resource group
Remove-AzResourceGroup -Name 'lscdemo-rg'


#Recreate the Resource Group
New-AzResourceGroup -Name 'lscdemo-rg' -Location 'EastUS'


#We can deploy ARM Templates using the Portal, Azure CLI or PowerShell
#Make sure to set the adminPassword parameter in parameters.json around line 80 "adminPassword" prior to deployment.
#Once finished, look for ProvisioningState Succeeded.
New-AzResourceGroupDeployment `
    -Name mydeployment -ResourceGroupName 'lscdemo-rg' `
    -TemplateFile './template/template.json' `
    -TemplateParameterFile './template/parameters.json'
Using this template we can now deploy the virtual machine in Azure.
Clean up resource
Now the Demo is complete for creating a virtual machine. It is time to clean up the resources we used.
When no longer needed, you can delete the resource group, virtual machine, and all related resources.
Go to the resource group for the virtual machine, then select Delete resource group. Confirm the name of the resource group to finish deleting the resources.
Related resources
- provision virtual machines (VMs)
- configure, validate, and deploy ARM templates
- configure container images for solutions
- publish an image to the Azure Container Registry
- run containers by using Azure Container Instance
Conclusion
In this post, I have covered the topic of the Provision of virtual machines using ARM Templates. This is part of implementing IaaS solutions, part 4. Happy learning!.