Introduction
This post covers how to Provision virtual machines using Azure CLI. This is part of implementing the IaaS solutions topic. This is a continuation of the previous post Provision virtual machines using the Azure portal.
This module’s topics are part of implementing IaaS solutions and I will cover “Provision Virtual Machine”.
Provision virtual machines using Azure CLI
In order to work with Azure CLI, first, we should download the Azure CLI and install it. I have a windows machine so I choose to download CLI for windows.
The Azure CLI is available to install in Windows, macOS, and Linux environments. It can also be run in a Docker container and Azure Cloud Shell. View complete details here
Now, I have installed Azure CLI. Let's get started with its usage.
How to use CLI
After CLI installation, you can use the windows command prompt or PowerShell.
I have used PowerShell for the demo.
Open PowerShell for CLI
Click on start or windows key => type "powershell" => open Windows PowerShell
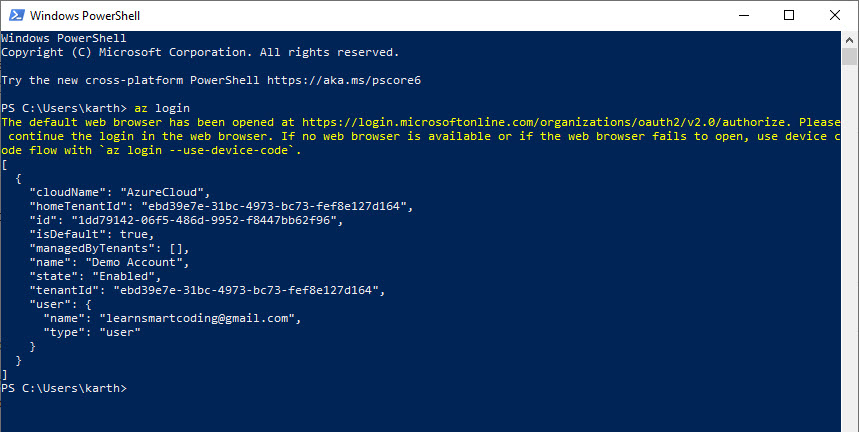
On the PowerShell window, enter the script as below and log in interactively. Login interactively meaning, a browser will open and you need to sign in to Azure Portal with your Azure portal credentials.
az login
az stands for azure and will be recognized once Azure CLI is installed in your machine.
Azure CLI commands to provision windows virtual machines
There are a lot many az vm commands. the below commands are used to create a VM with minimum required configurations. to check the full command list check az vm commands.
#Login interactively and set a subscription to be the current active subscription. My subscription name is "Demo Account", chnage to your subscription name
az login
az account set --subscription "Demo Account"
#Create a Windows VM.
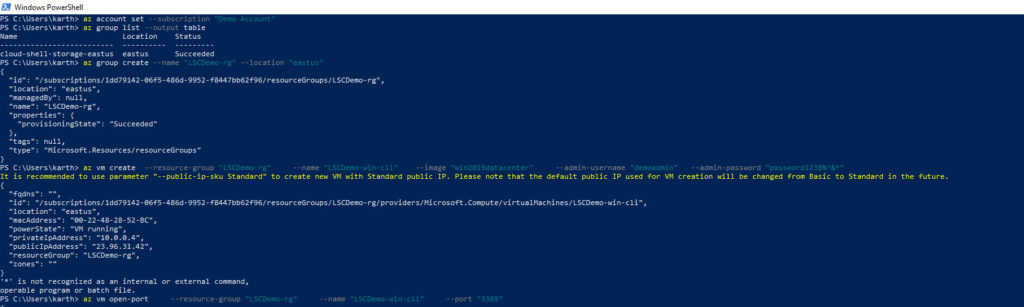
#check existing group listed in table format
az group list --output table
#Create a resource group.
az group create --name "LSCDemo-rg" --location "eastus"
#Creating a Windows Virtual Machine (for image, choose any avilable name)
az vm create
--resource-group "LSCDemo-rg"
--name "LSCDemo-win-cli"
--image "win2019datacenter"
--admin-username "demoadmin"
--admin-password "jsfdhsd$$Ddd$%^&*"
#Open RDP for remote access, it may already be open
az vm open-port
--resource-group "LSCDemo-rg"
--name "LSCDemo-win-cli"
--port "3389"
#Get the IP Addresses for Remote Access
az vm list-ip-addresses
--resource-group "LSCDemo-rg"
--name "LSCDemo-win-cli"
--output table

Verify and Log into the Windows VM via RDP
This topic is already covered in my previous post, if you haven't read the post, check here Provision virtual machines using the Azure portal | Implement IaaS solutions | Part 1
Azure CLI commands to provision linux virtual machines
Creating Linux virtual machines is almost the same as creating a Windows VM. There are only a few changes and the authentication mechanism needs to be changed. Let's dive in and learn.
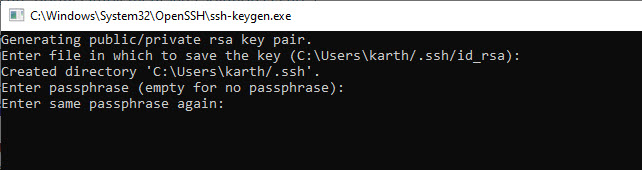
The authentication mechanism used for Linux is SSH. First, we need to generate a public/private RSA key pair, to do so you can use "ssh-keygen" available in your machine.
Steps
- Type "ssh-keygen" in run command. This opens up a terminal.
- "Enter file in which to save the key (C:\Users\karth/.ssh/id_rsa):" for this promt, leave it. Just press enter. This action will create a folder under current user name.
- Enter passphare. enter a password here and then enter again when asked.
- That's it, the file is created.
#Creating a Linux Virtual Machine
az vm create
--resource-group "LSCDemo-rg"
--name "LSCDemo-linux-cli"
--image "UbuntuLTS"
--admin-username "demoadmin"
--authentication-type "ssh"
--ssh-key-value ~/.ssh/id_rsa.pub
#OpenSSH for remote access, it may already be open
az vm open-port
--resource-group "LSCDemo-rg"
--name "LSCDemo-linux-cli"
--port "22"
#Get the IP address for Remote Access
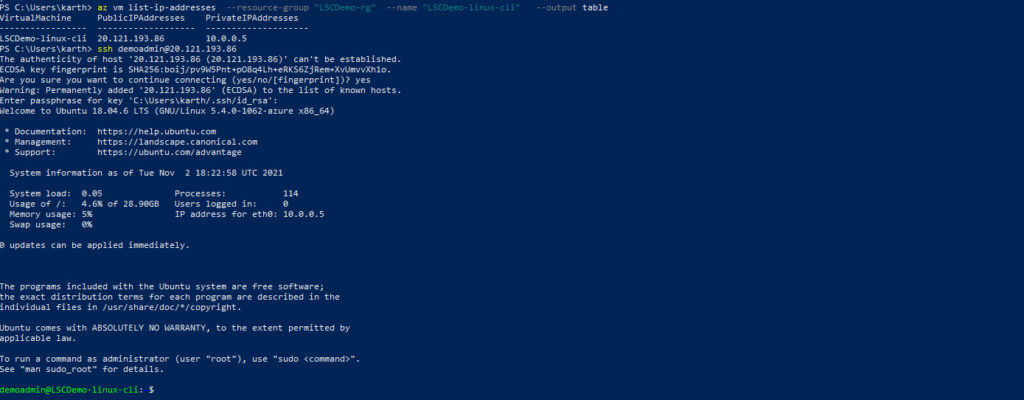
az vm list-ip-addresses
--resource-group "LSCDemo-rg"
--name "LSCDemo-linux-cli"
--output table
#Log into the Linux VM over SSH (paste the ip from above command, see image)
ssh demoadmin@PASTE_PUBLIC_IP_HERE

Connect to Linux VM
Once you attempt to connect to the VM, it will prompt for the passphrase that was used to create ssh file. Provide the same passphrase to connect to VM.
Video tutorial
Clean up resource
Now the Demo is complete for creating a virtual machine. It is time to clean up the resources we used.
When no longer needed, you can delete the resource group, virtual machine, and all related resources.
Go to the resource group for the virtual machine, then select Delete resource group. Confirm the name of the resource group to finish deleting the resources.
Related resources
- provision virtual machines (VMs)
- configure, validate, and deploy ARM templates
- configure container images for solutions
- publish an image to the Azure Container Registry
- run containers by using Azure Container Instance
Conclusion
In this post, I have covered the topic of the Provision of virtual machines using Azure CLI that is part of implementing IaaS solutions. This post covers CLI commands for creating both Windows and Linux VM. Other parts of this exam are covered in other posts. Happy learning!.